Showing posts with label How To. Show all posts

Sunday, June 14, 2009

blog #299 >> How To: Make a Skirt
from an Old Coat

Up from the scraps of a ruined coat it rose and took shape and formed... a skirt!

Here is the frumpy old coat I bought at "The Bins" and how I turned it into a skirt and a bag. And they turned out quite nice at that. It was the exact fabric I've been looking for, and I figured this way my skirt was half sewn for me already. Here's the inspiration skirt I fell in love with months ago.

It reminds me of "Joseph had a Little Overcoat" a Jewish tale about Joseph who had an old worn-out overcoat. First he cut off the bottom and turned it into a jacket. Then the jacket got worn out so he turned it into a vest. Then the vest got old and tattered so he turned it into a scarf. When the scarf got old he turned it into a handkerchief. And when at last the handkerchief was no longer usable, he made that into a button. One day he lost the button. And he was so sad that he wrote a song about it. Which just goes to show you, you really can make something out of nothing!


T

Tuesday, March 10, 2009

blog #256 >> How to Pin a Hat Pin


How to use a hat pin:

First of all, ask yourself...

Do I need a hat pin?

Does my hat fall off my head without one?

Do I have enough hair to pin it to?

Will I need an impromptu sword?

If you answered "no." to one or all of these questions, then this post is probably not for you. However if you answered "yes." then you've come to the right place.


You see hat pins aren't for everyone. And you can't wear one with just any hat or any hair style.
You're going to need:

a: hair (Lots of it, piled on top of your head, like the Gibson Girl.)

b: a hat (It could be the type of hat that's easily confused for a two pound, double layer, birthday cake, or a tiny pill box hat that would blow away with the slightest breath of wind. The trick is to use a hat that's not going to stay on your head no matter what. Baseball caps, stocking hats and construction hats don't need hat pins)

c: a hat pin (Hat pins come in all different lengths and styles. If you have a little 40's hat, pick out a little pin, if you have a giant Victorian hat, use the shish kebab length hat pin.)


If you don't have enough hair to pin your hat to. And your hat stays on your head reasonably well. And you have your heart set on using a hat pin, the best thing you can do is pin the hat pin into your hat before you put it on and just have it there for looks. But if you've got big hair continue below.


1: Stick the pin into the hat just above the hat band, towards the front, on the right side of your hat if you're right handed, left if left handed, or in a decorative spot if the hat has one. Push it in about three quarters of an inch.

2: Put the hat on your head.

3: Carefully, push pin through hair, sideways, towards the back, and out the other side. If you're using a short pin you should catch about an inch and a half of hat. If you're using a long pin catch about three inches. And if you're using a really long pin about five inches.
Do not push pin straight into your head!


And there you have it. Your hat is now pinned perfectly onto your head.

T

Photos from Shorpy and Plan 59.

Sunday, February 22, 2009

blog #252 >>The Joys of Jello: Part 2 - Molds


In my fight to educate the public about the awesomeness of Jello I'll be posting a series of my favorite Jello recipes. Today's topic will be the classic Jello mold.

My Basic Jello Mold Recipe
(This is the one I use for every single one of my Jello concoctions.)

2 3oz boxes of Jello (or 1 6oz box)
2 envelopes of Knox plain gelatin
2 cups boiling water (or more)
(just think 2+2+2 and if you double it 4+4+4)

Mix Jello and gelatin in a large glass mixing bowl. (Don't use metal it will absorb all the heat of the boiling water.) Add boiling water stir about 3 minutes until gelatin is completely dissolved. Pick your Jello mold. Most hold about 2.5 - 3.5 cups liquid. Pour Jello into mold and top off with extra water if needed. Stir lightly in mold. (If you're unsteady and clumsy like me. I would suggest putting your Jello mold in a pan before filling for easier handling. Spilling Jello on the floors will make them sticky for weeks.) Place Jello in refrigerator. Chill overnight or until completely set. Now you're ready to unmold it. This is the hard part. But if you used the recipe above it's going to be super firm and much less likely to break apart. Here are the three main ways to unmold your Jello:


(a) Run a small pointed knife that's been run under warm water around the top edge of the mold to loosen it. (I've had very poor results with this method and quite trying it.)

(b) Moisten tips of fingers in warm water and gently pull gelatin away from top edge of the mold. (I almost always use this method to release them and it works great.)

(c) Dip your Jello mold just to the rim in luke warm water (DO NOT USE HOT it will melt the whole thing!) for about 10 seconds. Repeat once if necessary. Do not make your water hotter or dip more than twice. (I only use this method for though ones, after the top methods have failed.)

(d) Lift from water and shake gently to loosen from edges.

(e) Moisten the top of the gelatin. (This makes it easier to position on plate.) Place lettuce around the edges and hold in place with plate. (Do not use warm plate it will melt the Jello.)

(f) Then invert mold and plate together. Lift mold off.

(g) If your Jello is absolutely STUCK, and won't come out after dipping it twice in the luke warm water. Do NOT dip it again. The problem isn't that it hasn't melted enough. You don't need to melt it at all. The problem is that it's created a vacuum and your Jello mold is acting like a giant suction cup. The best way to get it out now is to slip a finger down one of the sides carefully and work your way around the mold, until you hear the "Swoosh" sound. Then you'll know that the vacuum seal has been broken and you can carefully pull it out the rest of the way with your fingers or invert it on a plate.

Good luck!
T

Monday, January 26, 2009

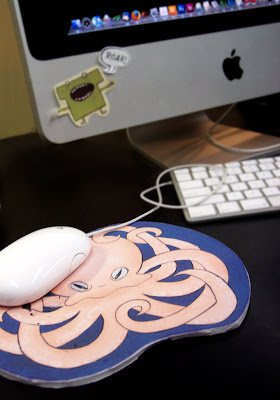
blog #230 >>How To: Make a Mouse Pad


The great thing about IKEA is their stuff is so cheap and simple, it's easy to take it and make it into something new. Here's the "How To" for my IKEA hacked mouse pad.


Step 1: Supplies: IKEA plain white mouse pad (or any cheap old mouse pad, but if you don't use white the background image will show through.) Super 77 spray glue (Regular spray glue won't hold. You need the archival quality of Super 77.) Scissors, Plain white glue, Scotch Guard (Or clear gloss spray paint. I never have Scotch Guard.) and Printable Fabric (This stuff is really hard to find and comes in many different varieties. I use the cotton twill variety. I found mine at Super Joann's and it's pretty spendy stuff. I think it cost me $10 for 5 sheets, so you don't want to waste it. Don't buy iron on transfers or iron on fabric sheets, the heat will melt and warp your mouse pad. I tried that once. And I've never tried the adhesive backed polyester sheets. It seems like it wouldn't hold up to the wear and tear of a mouse pad.)

Step 2: Open your image in your favorite photo editing program. (Photoshop all the way for me.) You'll want to adjust your image and make it a little darker and brighter. It always prints lighter on the fabric paper. Print RGB (home printers almost always use RGB color mode.) And high quality (200dpi or more.)

Step 3: Do a test print. Draw and "x" on the top of a regular sheet of paper and determine if you need to load your fabric paper face up or face down. Check the size of your design to make sure it's not going to bleed off the mouse pad. Also check the color of the design you've chosen, and adjust if needed. If it's streaked, clean your heads. Add ink if it's low. It's best to print these right after you add a new ink cartridge. Print at 50% if you want to save ink. Just don't forget, and change it back to 100% before you actually print the mouse pad.

Step 4: Print your mouse pad. I'm not going to lie to you. It's going to jam... at least 15 times. And you may even break your printer. Fabric paper pushes poor little desktop printers past their limit. And your printer will probably hate you for life. But there are things you can do to prevent paper jams. Use photo paper setting, let your printer know you're trying to print on something really really thick. Don't print the fabric paper by itself. Fill your printer's paper tray FULL of paper so there's just enough room to load the fabric paper on top. Then tape down the regular paper so the printer won't grab it on mistake and try to run two sheets together. Filling the tray full of paper pushes the paper higher toward the grabbers and then it squishes the paper down a little bit pushing it through. It will probably still jam. But it's going to help.

Step 5: After you have successfully printed your design. Let it dry completely. At least a half hour. You don't want it to smear.

Step 6: When it's dry, peal the paper off the back. (If it's that type of fabric paper.) The instructions on the package say to run it under cold water, which I did last time and regretted. It stretched the image and frayed the fabric. And I'm still not sure why you're suppose to do it. Perhaps to wash the glue off the back? Anyhow I skipped that this time and ended up with a much better mouse pad.

Step 7: Spray the back of the image and front of the mouse pad with Super 77. Do this OUTSIDE! Then stick them together, and let it dry completely, at least a half hour.

Step 8: Cut it out. Since IKEA mouse pads are round the top will always show. I usually cut mine out with scissors. It's always a little ragged. But I can't find a better way to cut them. If you find one, please let me know.

Step 9: Scotch Guard or clear coat the top. Mouse pads take a lot of wear and tear and you will inevitably spill coffee or tea on it at some point. Take precautions now! Give it some type of protective layer. Spray this outside too.

Step 10: Glue the edges to prevent fraying. Just run a little Elmer's Glue, or Tacky Glue or Mod-Podge or whatever type of glue you're into, around the edge of the fabric and foam. It will really help in the end. Let it all dry... and there you have it! You've very own custom made mouse pad. For only about $3.50... assuming you only use one sheet of printable fabric and a little ink.

Enjoy and have fun crafting,
T

Sunday, June 22, 2008

blog #113 >> How To: Tissue Paper Flowers

A Fanciful Twist is hosting a Virtual Mad Tea Party {Of the Costume Variety}, next Saturday. So, I figured at the very least... I'll be needing a mask, and perhaps even a costume. And that's when I found this:


I simply fell in love with this picture of Marie Antoinette, from the movie. (I didn't like the movie as much.) Not that she was such a great queen either, but she did have great hair... well, wigs. And mine is just the right length now, that with the proper brushing, and a lot of gel, it could look like that. Only my hair is more black less white. So yes, my costume will be Marie Antoinette.


Yesterday, I made this tissue paper nosegay for my hair.
Tissue paper flowers make beautiful Ranunculus, Peonies and Chrysanthemum.

To make some yourself you will need: tissue paper, florists wire, scissors, chalk pastels or make-up (especially blush,) paint brush, and florists tape (which is optional.)


Step 1: Cut out your petals using template above.

Step 2: Cut about 6" florist's wire. Starting in the middle of the wire, twist around the middle of six of the smallest petals. They'll get all crinkly.

Step 3: Take the other six smallest petals and arrange them to form an X with the first. See diagram. Twist together.

Step 4: Continue with the middle sized petals, six at a time, always adding them the opposite direction of the previous one.

Step 5: Continue with the largest sized petals. Finish by tightly twisting your wire together and if desired wrapping it with florist's tape.

Step 6: Open your flower and separate the petals.

Step 7: Use a paint brush and chalk pastels to tint your tissue paper. (I always use white tissue paper, and tint them for a delicate look. But if you like bright colors just use colored tissue paper.)

Step 8: Blush makes a beautiful pink Peony! (I guess that's not a step, but it made such a nice picture.)

Step 9: For the leaves, color the tissue paper first. Cut using template above and wire together.

Step 10: Wire all flowers together. If making a bud, cut large circle. See template above. Fill circle with wad of tissue paper. Wire together tightly. Color leaves and bud first, then wire the leaves to the bud to hid the previous wiring. Cover wire with florist's tape if desired.

And there you have it a nosegay pretty enough for the Queen of France!
T

Friday, June 20, 2008

blog #111 >> How To:
CD Slim Cases Make Great CD Cases


Oh, what to do at work when it's slow?
Today's option is... Let's be crafty! It is the "art" department after all.
So, we made these nifty-neat CD holders made from slim cases. Clients always seem to send their artwork on disks and with disks come slim cases. I've got about 50 of them (slim cases not clients) stashed under my desk.

Here's a how to: (I'll post the download when I'm at home tonight.)

For more slim case ideas see HERE.

T

Saturday, June 7, 2008

blog #102 >> How To: Darn it!

Yesterday, I noticed I had a gigantic hole in my favorite sweater... Darn it! But luckily, when things got slow at work I watched this video on YouTube teaching how to darn a sock... and I figured, if you can darn a sock... Why not a sweater? Here follows my account of how I saved my sweater's life.


Step 1. Supplies: You are going to need, something with a hole in it, scissors, a giant needle, darner, and yarn. Preferably yarn a similar color to the holey garment, but contrasting is a fun change too.
Step 2. Turn sock, sweater, scarf, hat, knitted/crocheted thing inside out. Place your darning mushroom, or in my case, a tumbling-tumbler inside the thing you're darning.
Step 3. Weave the needle in a straight line, about a half inch away from the hole, catching every other stitch. Keep in mind the finished size will be a square.
Step 4. Weave the needle the opposite direction, catching every other alternating stitch. It's kinda like weaving a lattice top pie.
Step 5. Continue weaving, when you get to the hole go across in a straight line, continue weaving on the other side.
Step 6. Continue weaving until you get a half inch beyond the hole. Stitches should form a square.
Step 7. Start weaving the opposite direction, 90 degree angle from where you started.
Step 8. Weave every other stitch across the hole. Tuck stitching in through here tightly.
Step 9. Continue until finished. Tie off.
Step 10. Turn right side out. Admire your good/poor work.
The End
T

Tuesday, June 3, 2008

blog #099 >> Green Things

Here's the latest craft project I want to try. Making plastic sheets from plastic bags. Recycling DIY style. And the possibilities for these are endless. You could make shopping bags, raincoats, drapes, clothes, shoes, purses, lunch bags, bibs, quilts, table cloths, tents, wallets, lamp shades. It's a great fabric substitute, especially for oil cloth.

See how to's here
and here.

And for other good green living tips and ideas, go visit my sister's blog Good Green Livin'. She's got lots of great ideas on how to spend less money and waste less stuff.

T